
This post is also available in:
 Français
In the EVC-net platform, charge points are crucial components of the electric vehicle charging infrastructure. They are typically pre-registered in evc-net.com by LMS, depending on the controller type within the charge point. Here is a comprehensive overview of the functionalities and key elements associated with charge points:
Charge points can have three configuration status levels:
- Registered CP: The charge point is known in the system but is inactive.
- Activated CP: The charge point has a complete configuration with all the necessary attachments.
- Connected CP: The charge point is connected to the system and is online (assuming normal operation).
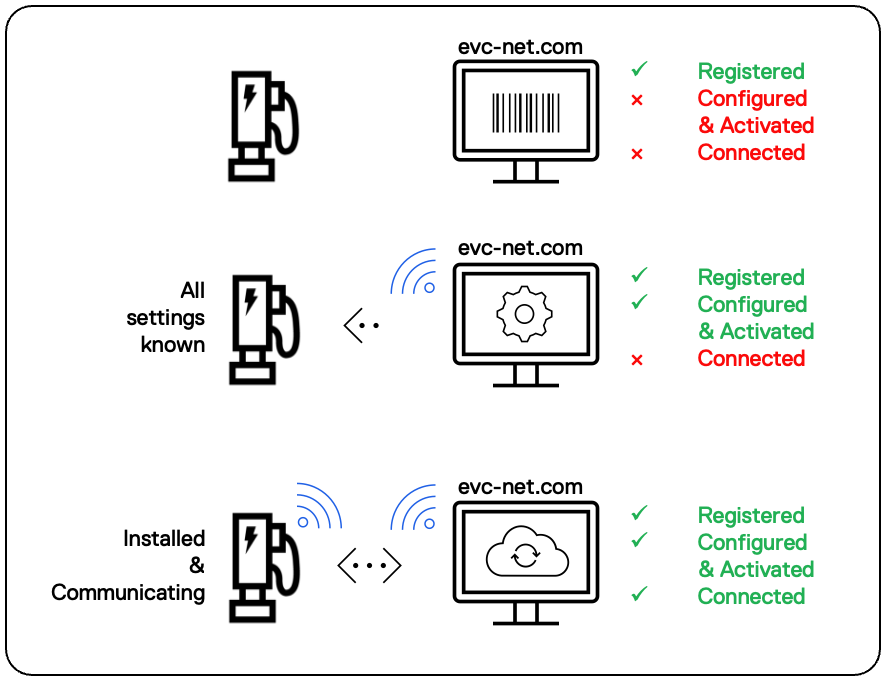
Important Charge Point Elements
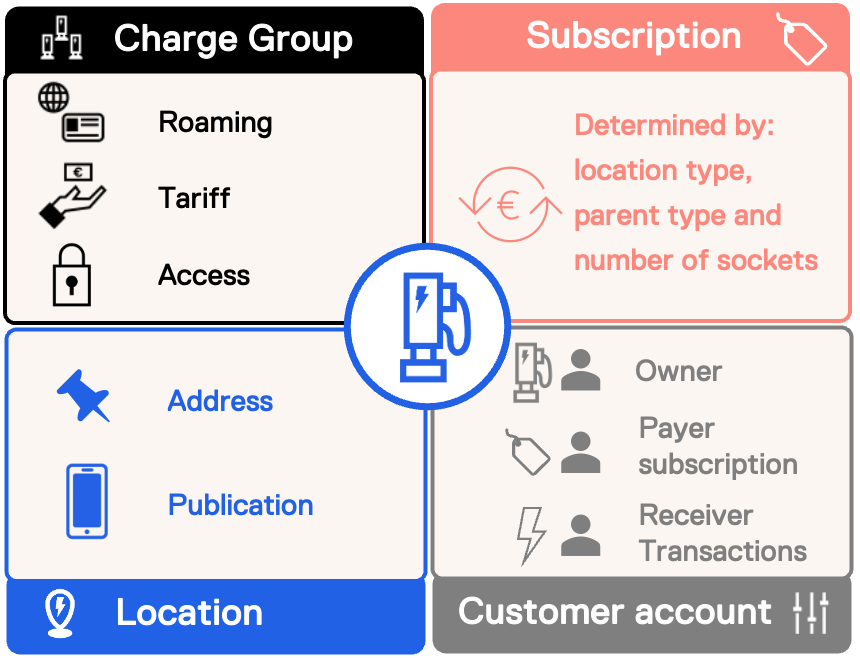
Four essential elements, known as “attachments,” must be set before activating a new charge point:
Charge group
- Every charge point needs to be assigned to a charge group. The charge group defines the access policy for the charge point, determining who can use it and at what tariff rate. It is mandatory for every charge point to have a charge group attached to it.
- Roaming capabilities can also be activated for a charge point within the charge group settings.
Product (Subscription)
- The product or subscription pertains to the hosting of a charge point. It is based on factors such as the location type, parent type (master or slave), and the number of sockets available on the charge point.
Location
- The location element specifies the exact position of the charge point. Additionally, you can determine whether the charge point should be published in third-party applications or not.
Customer
- A customer account is attached to every charge point. Three distinct roles must be configured for each customer:
- Owner: The entity that owns the charge point.
- Payer Subscription: The customer account responsible for the subscription fees associated with hosting the charge point.
- Receiver Charge Transactions: The customer account that will receive invoices for the charging transactions.
Charge Point Functionality Overview
The Charge Point functionality in the EVC-net platform provides a range of features and capabilities for managing individual charge points within your electric vehicle charging infrastructure. Here’s a detailed overview of the functionalities available per tab:
Status
In the “Status” section, you have the ability to activate or deactivate a charge point. If you have an active charge point that you wish to deactivate, simply click the “Deactivate” button. It’s important to note that deactivating a charge point will automatically terminate any associated subscriptions.
Subscriptions
Once a charge point is activated, you can access subscription details in this section. Here’s what you’ll find:
- The current subscription for the charge point, including its start date, is displayed here. Subscriptions are billed on a monthly basis.
- If an end date is specified for the subscription, it will be indicated. When a subscription is terminated, the end date corresponds to the last day of that month.
- When you make changes to a subscription, both the previous and new subscriptions, along with their respective start and end dates, will be visible.
- The new subscription becomes effective on the first day of the following month after any changes are made.
Subscriptions are based on:
Business = business address, e.g. a company location
Public = public address, e.g. public parking location
2 channels = charge point with 2 sockets (i.e. channels)
Slave (data use) = charge point communicating via another charge point to the back-office (i.e. indirectly)
Access
In this section, you can manage the access to the charge point by attaching a charge group. If a charge group is already attached, it will be displayed here.
Attached customers
In this subsection, you can assign customer accounts to three distinct roles:
- Owner: The customer account designated as the owner will have access to view the charge point and its details in the back-office.
- Payer Subscription: The customer account responsible for paying the subscription fee and receiving invoices for the subscription. For instance, when a company covers the subscription cost for a charge point installed at an employee’s home.
- Receiver of Charge Transactions: The customer account that will receive reimbursements for the charge transactions. This role is relevant when a charge point is located at a private address, and the customer (e.g., an employee) is eligible for reimbursement from an entity such as their employer for the energy costs incurred.
Charge point data
This section provides essential information about the charge point:
- Charge Point ID: The Charge Point ID is a unique identifier that distinguishes the charge point.
- Software Version: Displays the current software version installed on the charge point. Providers cannot perform software updates; please contact Last Mile Solutions for updates.
- Parameters: Parameters are the settings transmitted to the charge point. Predefined parameter sets are available, and advanced users can manually adjust these sets. Contact LMS to create predefined parameter sets if specific changes are required.
- Name: The charge point’s name, often similar to its Charge Point ID. Do not enter any personal data in this field due to data protection concerns.
- Reference: The reference is shown on the customer’s invoice and in the customer section of the back-office.
- Physical ID: The physical ID is located on the charge point and serves as a means of identifying it.
- Telephone: This is the telephone number used by the charge point for communication with the back-office. It cannot be adjusted. If a SIM card replacement is necessary, contact LMS for assistance.
- Communication Mode: Indicates the communication protocol used between the charge point and the back-office. For EVC controllers, this will typically be the LMS protocol. For OCPP controllers (charge points from third parties), it may be OCPP JSON or OCPP SOAP. Adjustments to this setting can only be made by Last Mile Solutions.
- Description: This field allows you to add additional information about the charge point.
- Automatic Tickets: Checking this box enables the charge point to automatically generate a ticket when a problem occurs. Note that the charge point must be active for this option to take effect.
Location
Accurate location details for a charge point are crucial to ensure that EV drivers can easily locate the charge point through smartphone applications and other third-party websites. Location information should be meticulously recorded and can be created separately or linked to an existing location, which is then attached to the charge point. This ensures that the charge point is correctly mapped for users’ convenience.
Channels
Channels are the sockets of the charge points, and this section allows for the management of their details. This includes configuring the number of channels, specifying power details (which will be displayed in third-party apps and websites if the charge point is published), and ensuring compatibility with hubs or other systems.
Management information
The dashboard at the top provides predefined management information, including detailed graphs and functionalities about the charge point. This information covers various aspects such as the current status of the charge point, occupancy, transaction history, charge card access testing, and more.
Most recent transactions
In this section, you can find information about the most recent transactions conducted at the charge point. This includes details about the charge cards used, start and end dates of transactions, the specific channel (socket) utilized, the amount of energy delivered, and the reimbursement amount for the “receiver charge transactions.”
Real-time dashboard
This area displays the real-time status of the charge point, broken down by channel. It provides detailed logs and uses color coding to indicate the status of each channel:
For remote charge point management, the following functionalities are available:

- Hard reset – Running transactions will be stopped and will not be restarted
- Soft reset – Running transactions will be stopped and will be restarted after start-up
- Block – Disabling use of charge point
- Unblock – Re-enabling use of charge point
- Unlock connector – Unlock the connector remotely
- Start transaction – Start transaction remotely
- Stop transaction – Stop transaction remotely
- Retrieve Status – Get the latest status of the charge point
- Get parameters – Retrieve the currently used parameters
- Clear cards cache – Remove all cached charge card ID’s
- Get diagnostics – Extract detailed diagnostics from charge point
- Send local list – Retrieve all charge card ID’s stored locally (whitelist)
- Clear local list – Remove all charge card ID’s stored locally (whitelist)
- Set charging profiles – Set the charging pattern of the charge point
When the charge point is part of a master-slave network, which involves linking multiple charge points together for communication and load balancing distribution purposes, you can access this information on the ‘Network’ tab of the charge point page.
Here, you will find a dashboard overview similar to what is available on the ‘Dashboard’ tab. Additionally, there will be a table displaying the charge points that are attached to the network. This table provides information about which charge point serves as the master of the network.
In this section, you can access an overview of support tickets and their current status. Support tickets can be created manually by a customer or system user, or they can be generated automatically by a charge point.
Ticket automatically created by charge point
- When a charge point encounters an error or issue, it will automatically generate a support ticket that specifies the nature of the problem.
- The system user responsible for the charge point will receive a notification indicating that a new ticket has been created.
- The system user can then take appropriate action to resolve the error or issue and address the ticket.
Ticket manually created by customer
- Customers have the option to create support tickets manually if they have questions, remarks, or require assistance.
- Customers can initiate this process through their customer account, typically found under the ‘Tickets’ tab.
- Creating a manual support ticket allows customers to seek help or clarification regarding any aspects of the service or charge point.