This post is also available in:
![]() Français
Français
Ready to set up your charge point and connect it to EVC-net? Follow the steps below for seamless charge point implementation.
What do you need to get started?
- System User account in EVC-net
- SIM Cards / LAN / WLAN to connect Charge Points
- Access to Charge points that need to be connected to EVC-net
- Charge point details
- Charge Station Product
- Charge Group
- Customer
- Location
Step 1: Register Charge Points in EVC-net
Depending on your system user rights, you can either import the charge stations in EVC-net yourself, or have to request charge station import via support.
OCPP Charge Points
- Fill in the Charge Point Import File Excel template
- Send the completed file to support@lastmilesolutions.com, or
- Go to Charge Points > Import if you have the system user access to this functionality
Ecotap Charge Points
- Send an email to support@lastmilesolutions.com including the Chargepoint IDs of the stations you want to transfer to your user group.
- Copy a contact person from Ecotap in the email, since we require Ecotap to actively agree to the transfer.
- Alternatively, you can ask Ecotap to request the transfer of the station for you.
Step 2: Update Charge Point Settings
Connect the charge point with EVC-net back end by setting up the APN and endpoint configuration on the charging station. This can differ per manufacturer and model.
Please use the following settings depending on how your station is connected:
KPN Sim Cards
| APN Settings | |
|---|---|
| APN Name | evc-net.apn |
| APN username | leave empty |
| APN password | leave empty |
| OCPP JSON | |
|---|---|
| OCPP-J 1.6 endpoint | ws://ws-private.evc-net.com/ |
| OCPP-J 1.5 endpoint | ws://ws-private.evc-net.com |
| OCPP-SOAP 1.5 endpoint | http://private.evc-net.com/api/evc/ocpp/1.5 |
| Important | |
|---|---|
| configuration key WebSocketPingInterval | 240 |
LAN, WLAN
| OCPP JSON | |
|---|---|
| OCPP-J 1.6 endpoint | ws://ws.evc-net.com |
| OCPP-J 1.5 endpoint | http://www.evc-net.com/api/evc/ocpp/1.5 |
| Important | |
|---|---|
| configuration key WebSocketPingInterval | 240 |
| Port | 80 |
| Path | / |
DNS Settings
| Important | |
|---|---|
| DNS Setting | Automatic (if not possible, see below) |
| Primary | 10.63.1.63 |
| Secondary | 10.63.1.64 |
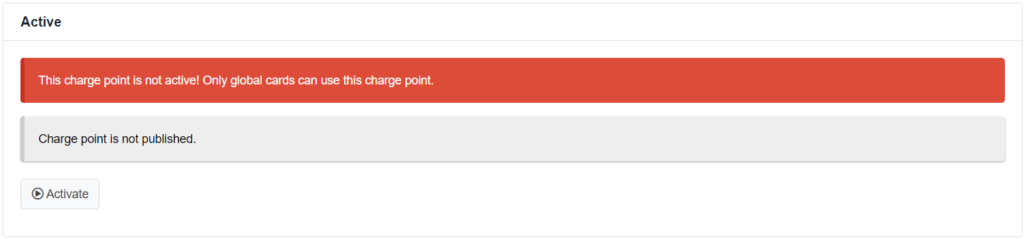
Step 3: Activate Charge Point in EVC-net
To activate a charging station in EVC-net, you need to preset the Subscription, attach Charge Group, Customer and Location – for each station separately.
- Click on Charge point > Search
- Search for inactive charge points: Active > select Inactive
- Open the charge point and follow the next steps.
Subscription
- Click on Preset to attach a Subscription
- Select the subscription from the list
- Click on Preset.
- The subscription will be automatically activated as soon as the charge point is active.
- The start date is always 1st of the month.
Charge Group
- Scroll down to “Access” section
- Click on Attach charge group
- Search for charge group you want to attach
- Click on the Charge group ID to attach it
Customer
- Scroll down to “Attached Customers” section
- Click on Attach customer
- Search for the customer you want to add
- Click on the Customer ID to attach it
By default, the customer will be attached as Owner, Payer subscription and Receiver charge transactions.
To assign a different customer as Owner, Payer subscription or Receiver charge transaction:
- Click on Attach customer again
- Search for the customer you want to add
- Select which role they should have
- Click Attach
- Now there are several customers attached to this charge point, with different roles.
Location
- Scroll down to “Location details” section
- Click on Attach to location
- Filter on location by typing in a “Search term” or
- Click Search to show all existing locations
- Click on the Location ID to attach it to the charge point.
Channels
- Scroll down to “Channels” section
- Click on the channel you would like to update
- Click on Update to set up and adjust existing channels
- Click on New if you need to add additional channels – ignore this step if it is not applicable
- Click on Save
Check Charge Point Status
- Scroll to the top of the page
- Click on Dashboard tab on the top panel (right from “Data”).
- Scroll to “Real-time Dashboard” section
- Check if the Status is green
- If no > check the APN and endpoint settings / configuration
- If yes > click on “Get parameters” and refresh page after.
Charge Point Data
Follow the instructions below to allow Charging profiles on your charge point. If charging profiles are enabled, you will be able to, for example, set up opening hours on your charge station and allow remote start stop.
- Scroll to the top of the page
- Click on Data tab on the top panel (left from “Dashboard”).
- Scroll to “Charge point data” section
- Click on Go to parameters
- Go to section General – OCPP capabilities
- Tick all three options
- Click on Save
Activate Charge Point
- Scroll to the top of the page
- Click on Activate
- Your charge point should be active and online