In this article you will learn how activate a Payter Payment terminal via Payter Cloud integration with Last Mile Solution as a Merchant and connect it to one of your Charge Points. This section is not applicable in case you have other type of payment terminal or a direct relationship with a payment service provider.
What do you need to get started?
- System User account in EVC-net
- A charge point already setup and fully configured at EVC-net
- Access to Computer
- Signed contract addendum with Last Mile Solutions for enabling Payment Terminals support through EVC-net.
- Apollo payment terminal installed in a Charge Point with internet access
- Serial Number of Apollo terminal to be activated
Step 1: Activate the Payment Terminal
Last Mile Solutions will take care of the payment terminal activation towards Payter. To do that, we need you to fill in the Payter Import File that can be downloaded in the “Import File” section of the support page:
- Payment Terminal Serial number
- Payment Terminal Reference/Name
- Country where the payment terminal will be installed
- Connection mode – via SIM or LAN
- Confirmation if the SIM card is provided by Payter
- Charge Point model where the Payment Terminal will be installed.
After the form has been filled out, please send it to: support@lastmilesolutions.com
Step 2: Connect the Payment Terminal to a Charge Point in EVC-net
There are 3 options to connect a payment terminal to a Charge Point:
- Individual Payment Terminal (see below)
- Bulk import of multiple Payment Terminals – via support@lastmilesolutions.com
- Charge Point update API (contact your account manager for more information)
Individual Payment Terminal
- Log in to your EVC-net
- Go to “Charge Points” > Search
- Search the charge point you want to connect the payment terminal to
- Open the charge point
- Scroll down to section “Payment Terminal”
- In Payment Terminal Serial Number field, enter the Payter Terminal serial number
- Click “Save” at the bottom of the page.
- You should receive a confirmation that the payment terminal has been linked to the charging point.
- At the moment of saving, we will verify with Payter the status of the Payment Terminal activation.
- In case there are any issues with the terminal activation process or the serial number is invalid, you will see an error message instead.
Once a payment terminal is activated and connected to a charging point, EV-drivers can start using their payment cards to start/stop their charging sessions.
Step 3: Enable Remote Start Stop on the Charge Point
- Scroll to “Charge point data” section
- Click on Go to parameters
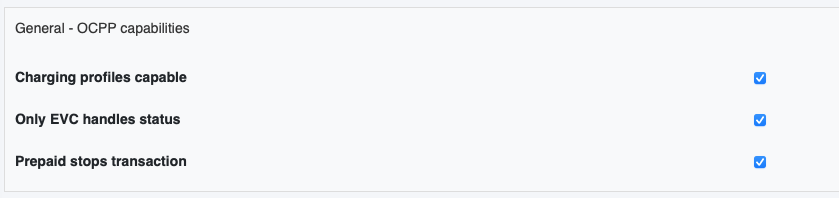
- Go to section General – OCPP capabilities
- Tick all three options
- In OCPP – Configuration section, tickAuthorizeRemoteTxRequests
- If no parameters show in this section, click “Get parameters” first to retrieve them from the charge point. After this, the option should show.

- Tick “Select” next to all the fields you have adjusted
- Click on Save