As a provider, you are able to do a migration of charge cards, customers, charge points, locations and charge groups between user groups.
Do you want to migrate to a sub-provider environment? Please request a migration with your account manager (CSM, Sales, Onboarding or Support).
What do you need to get started?
- System User Login
- Sub-user group
- Assets
- Charge Cards
- Customers
- Charge Points
- Locations
- Charge Groups
Migration Preparation
We highly recommend doing migration preparation. Please review the preparation steps below.
Reports
Please download the reports from the list below to ensure you have a list of connections between charge cards <> customers, customers <> charge points <> charge groups and charge points <> locations. This is especially handy to have in case the connections between these are broken during migration and you need to reconnect them again. Keep only the data relevant to the migration.
- 01. CPO Data
- 02. eMSP Data
- 04. Customer Data
Products & Tariffs
If you want to migrate to a sub-user group (which is NOT set up as a provider), the products & tariffs are inherited from the main user group. When charge groups, charge points and charge cards are migrated, the connections with tariffs & products will remain. In this case, no preparation is needed.
How To Migrate Charge Cards
You can do a charge card migration in bulk. We recommend migrating in bulk only charge cards that are not attached to customers.
Follow the steps below to migrate charge cards (without attached customers) in bulk:
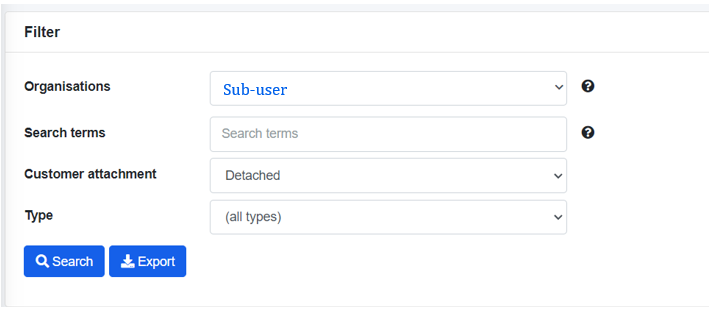
- Click Cards > Search
- Adjust the filter options as such:
- Select the user group where the cards are currently in
- Select “Detached” cards
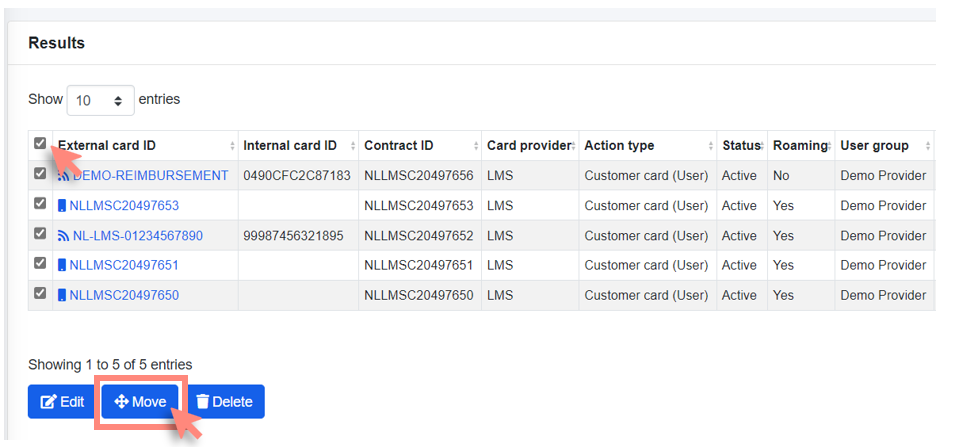
- From the results, select charge cards you want to migrate & click “Move” button on the bottom
- Choose the user group to which you want to move the cards from the drop down list & click “Edit”
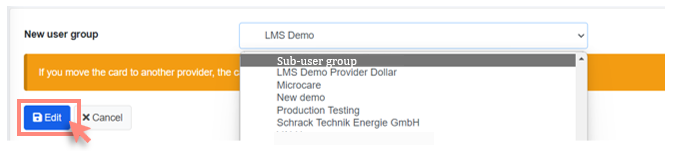
- Your charge cards have been moved to the new user group.
How To Migrate Customers (with Charge Cards)
Customers can be only migrated one by one and not in bulk. However, you can migrate customers and their attached cards all at once, whilst preserving the connection the customer might have to a charge point and/or charge group. We recommend migrating customers with attached charge cards.
Follow the steps below to migrate customers (with attached charge cards):
- Click Customers > Search
- Adjust the filter options based on your needs
- Open the customer account you want to migrate
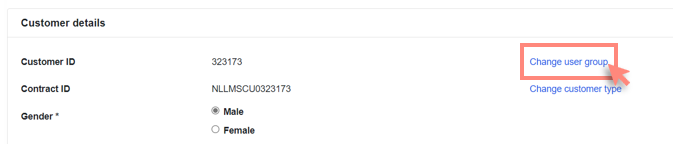
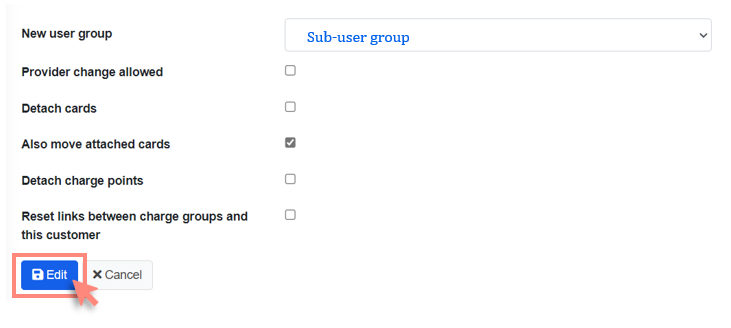
- Scroll down to “Customer details” section & click “Change user group”
- Select the user group you want to move the customer and attached cards to and tick the boxes as shown in the screenshot & click Edit.
- Untick Provider change allowed – this is not needed as you only migrate to a user group not a provider.
- Untick Detach cards – unticking this field means that the cards will remain attached to the customer
- Tick Also move attached cards – ticking this means the cards will migrate with the customer to the new user group
- Untick Detach charge points – unticking this field means that the connection between customer and charge point will remain. Charge point will not be migrated with the customer in this step, it will need to be migrated separately.
- Untick Reset links between charge groups and this customer – by unticking this field, the connection between customer and charge group will remain. Charge group will not be migrated with the customer in this step, it will need to be migrated separately.
- Your customer & attached charge cards have been moved to the new user group successfully. Repeat this step for each customer you want to migrate.
How To Migrate Charge Points & Locations
Charge points can be migrated one by one or in bulk. Follow the steps below to learn how to do each. When migrating charge points, locations need to be migrated too, one by one.
Migrate charge points & locations one by one
- Click Charge Points > Search
- Adjust the filter options based on your needs
- Open the charge point you want to migrate
- Scroll down to Location the charge point you want to migrate & open the location link in a new window
- Click Change user group

- Select the user group you want to move the location to and tick the boxes as shown in the screenshot & click Edit.
- Untick Provider change allowed – this is not needed as you only migrate to a user group not a provider.
- Untick Detach charge points – unticking this field means that the charge points will remain attached to the location

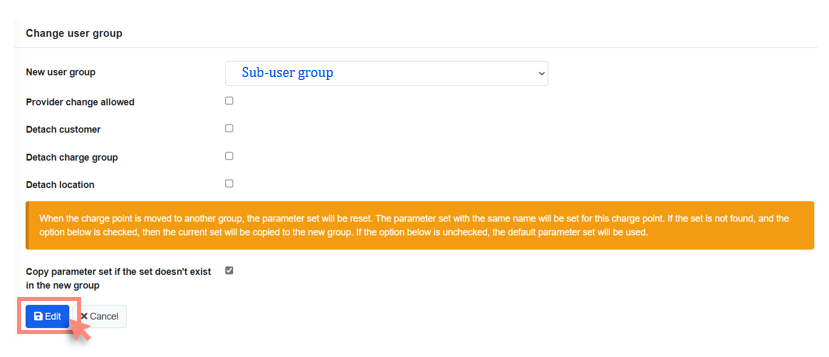
- Go back to the charge point screen tab in your browser. Scroll down to “Charge point data” section & click “Edit ID/user group”
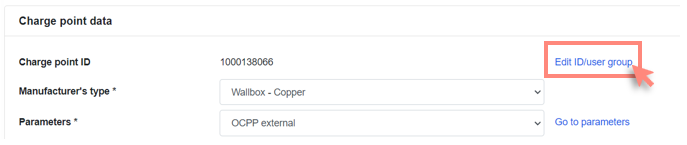
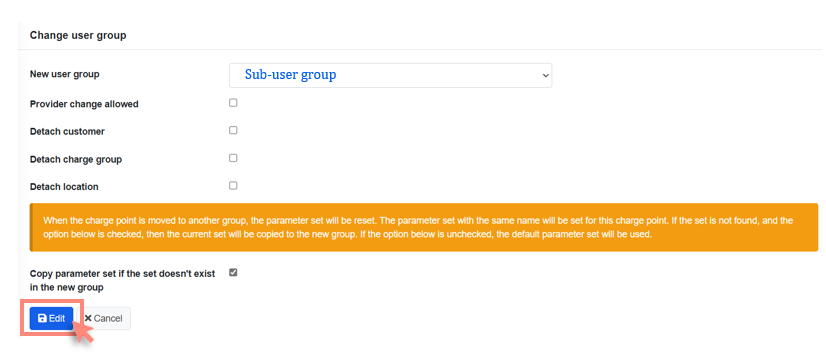
- Select the user group you want to move the charge point to and tick the boxes as shown in the screenshot & click Edit.
- Untick Provider change allowed – this is not needed as you only migrate to a user group not a provider
- Untick Detach customer – unticking this field means that the charge points will remain attached to the customer. The customer will not move with the charge point, you need to migrate it separately as described in previous step.
- Untick Detach charge group – unticking this field means that the charge points will remain attached to the charge group. The charge group will not move with the charge point, you need to migrate it separately.
- Untick Detach location – unticking this field means that the charge points will remain attached to the location. The location will not move with the charge point, it was migrated separately as described in previous step.
- Tick Copy parameter set if the set doesn’t exist in the new user group – ticking this field means that in case the parameter set does not exist in the new user group, the current parameter set of this charge station will copy and automatically apply itself to this charge station.
- Your charge point and location have been moved to the new user group successfully. Repeat this step for each charge point and location you want to migrate.
Migrate charge points in bulk
- Click Charge Points > Search
- Adjust the filter options based on your needs
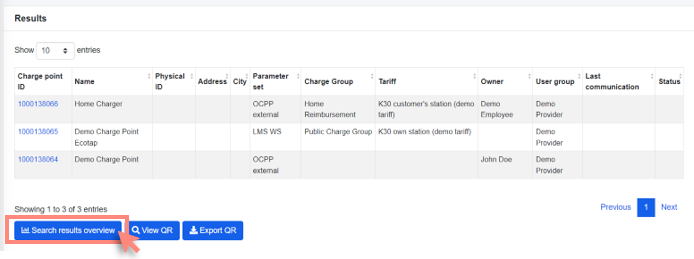
- In the search results, scroll down and click Search results overview
- Scroll down to the bottom and click “Change user group”
- Select the user group you want to move the charge point to and tick the boxes as shown in the screenshot & click Edit.
- Untick Provider change allowed – this is not needed as you only migrate to a user group not a provider
- Untick Detach customer – unticking this field means that the charge points will remain attached to the customer. The customer will not move with the charge point, you need to migrate it separately as described in previous step.
- Untick Detach charge group – unticking this field means that the charge points will remain attached to the charge group. The charge group will not move with the charge point, you need to migrate it separately.
- Untick Detach location – unticking this field means that the charge points will remain attached to the location. The location will not move with the charge point, it was migrated separately as described in previous step.
- Tick Copy parameter set if the set doesn’t exist in the new user group – ticking this field means that in case the parameter set does not exist in the new user group, the current parameter set of this charge station will copy and automatically apply itself to this charge station.
- Your charge point has been moved to the new user group successfully.
Migrate the location of each charge point one by one:
- Open the location you want to migrate
- Click Change user group

- Select the user group you want to move the location to and tick the boxes as shown in the screenshot & click Edit.
- Untick Provider change allowed – this is not needed as you only migrate to a user group not a provider
- Untick Detach charge points – unticking this field means that the charge points will remain attached to the location
How To Migrate Charge Groups
Charge groups can be migrated one by one only. Follow the steps below to migrate charge groups:
- Click Charge groups > Search in the left side panel
- Adjust the filter options based on your needs
- Open the charge group you want to migrate
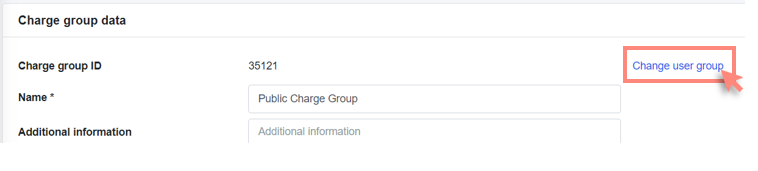
- Scroll down to “Charge group data” section & click “Change user group”
- Select the user group you want to move the charge group to and tick the boxes as shown in the screenshot & click Edit.
- Untick Provider change allowed – this is not needed as you only migrate to a user group not a provider
- Untick Detach charge points – unticking this field means that the charge points will remain attached to the charge group. The charge points will not move with the charge group, you need to migrate it separately as described in previous step.
- Untick Reset links between customer and this charge group – unticking this field means that the charge group will remain attached to the customers. The customers will not move with the charge group, you need to migrate it separately as described earlier.
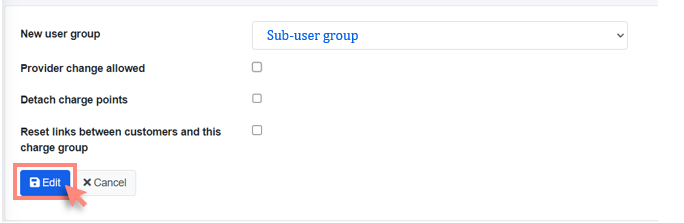
- Your charge group has been moved to the new user group successfully. Repeat this step for each charge group you want to migrate.